
Capture a device
The phone and the computer running zhttp need to be on the same Wi-Fi network.
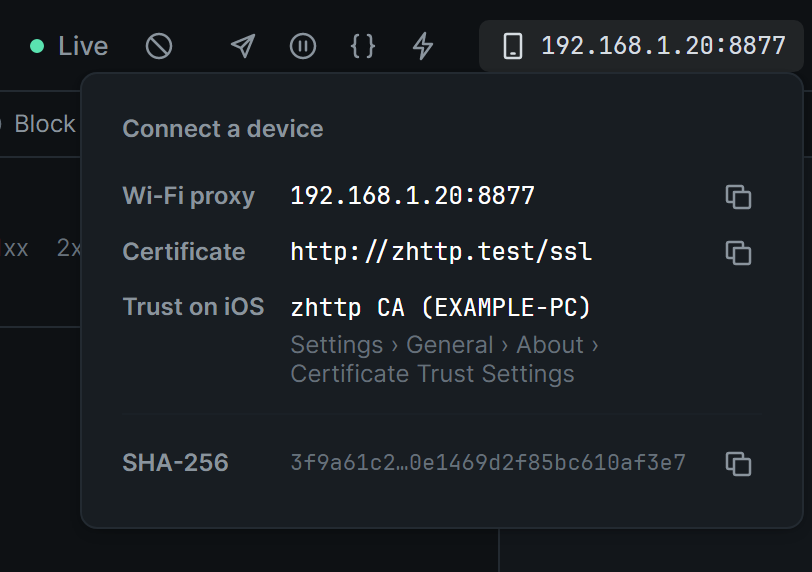
Click the address button at the top right of the window, the one that shows something like 192.168.1.20:8877 next to a phone icon. The panel it opens, Connect a device, has the Wi-Fi proxy to set, the address to get the certificate from, where to trust it on iOS, and the certificate’s SHA-256. The button beside a value copies it.
iPhone and iPad
Section titled “iPhone and iPad”-
Set the Wi-Fi proxy. Settings › Wi-Fi › tap ⓘ next to the network › Configure Proxy › Manual. Enter the server and port from the panel, for example
192.168.1.20and8877. -
Download the certificate. In Safari, open
http://zhttp.test/ssland allow the download. Usehttp://, nothttps://. The address only works while the device is using zhttp as its proxy. To turn it off, switch off Serve the certificate at under Settings → General; the address in the panel then becomes the setup page, for examplehttp://192.168.1.20:8877, where you tap Download the zhttp CA certificate. -
Install it. Settings › General › VPN & Device Management › tap the downloaded profile › Install.
-
Trust it. Settings › General › About › Certificate Trust Settings › turn on full trust for
zhttp CA (…). -
Open an app. Its requests appear in the list as they happen.
The page on the phone shows the certificate’s SHA-256. It should match the one in the Connect a device panel, which shows in full when you hover over it.
Other devices
Section titled “Other devices”The same page serves the certificate in two formats:
| File | Format |
|---|---|
http://<address>:<port>/ca.pem |
PEM, zhttp-ca.pem |
http://<address>:<port>/ca.cer |
DER, zhttp-ca.cer |
Install it as a trusted certificate authority, then set the device’s HTTP proxy to the address and port from the panel.
A program on this computer
Section titled “A program on this computer”To have programs that go by the system’s trusted certificates, such as browsers, trust zhttp, open Settings → Certificates and click Trust on this computer. On Windows, confirm the prompt and zhttp adds the certificate to your user’s trusted roots. On macOS, enter your password and zhttp adds it to your login keychain. Remove takes it out again.
Any program that takes an HTTP proxy works. Use 127.0.0.1 and the session’s port, and have it trust zhttp-ca.pem from the folder listed in Install. With curl:
curl -x http://127.0.0.1:8877 --cacert zhttp-ca.pem https://example.com/The curl built into Windows also needs --ssl-no-revoke. Without it, it tries to check whether zhttp’s certificate was revoked, finds nowhere to check, and refuses.
Who can connect
Section titled “Who can connect”zhttp accepts devices on your local network only: private addresses such as 192.168.x.x and 10.x.x.x, link-local addresses, and this computer.
What you’ll see
Section titled “What you’ll see”- Hosts appear on the left, requests in the middle. Click a request to read it on the right. The window explains each part.
- The session’s tab has a light: mint while it captures.
- A connection the app refused shows Client rejected the proxy in its TLS tab. The certificate isn’t trusted yet, or the app pins its own. See Troubleshooting.